Monday, January 23, 2012
Somewhere to rest my head.
Last night I picked my mother up from work. While I was outside waiting I noticed that there was a pallet laying on the ground next to the trash can. So I got my happy little butt out of the car and put it in the back seat. This morning I got the pallet out and decided it was going to be a headboard.
I have a house full of useful things so everything was just laying around which meant this craft was free! Which in my opinion is the best kind of craft!
It was so fun and easy. I got to stain wood for the first time ever!
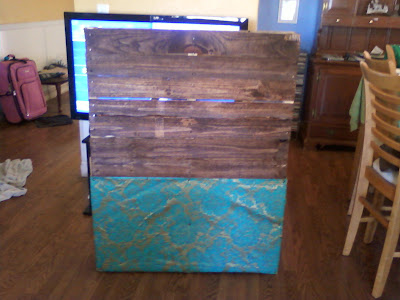
I started by taking off the wood on one of the sides and covering half of one side.
Then I stained it with some wood stain we've had laying around our house for years and never even opened.
After that all dried I took an old picture frame and I used the back of it as the lower half of my headboard and covered it with some old fabric I had in my room.
Then I needed something for the top because I'm going to use the top as bookshelf. So I had these old pieces of wood that came out of the bottom of an old dresser. They had just been in the back of my closet so I got them out. (They aren't going to be up there forever just until I can cut down the old shelf I have in the back yard.
I cleaned them off and stained them.
I attached the shelf bottoms to the top of my headboard to give me a small shelf for my books.
This is the back. I wanted this headboard to be awesome in a lot of ways, I added some lights to the back.
So now it lights up too!
Friday, January 20, 2012
Silver lining
Don't hate me! I had a birthday part a couple of weeks ago and I bought all these random things that I now have no need for. Among my finds, I found these three great silver serving trays at goodwill for five bucks. I had no idea what I wanted to do with them when I started, other than I was going to hang them on my wall.
I started by spray painting the two larger ones white. (at the time I was going to leave just one of them silver but I later changed my mind)
After they dried I realized I didn't like the plain white look. So I got out my pain and started mixing colors. I came up with this awesome teal color but I didn't have enough of it to do all three trays. So I used a bright yellow and red for the other two.
While they all dried I started stringing glass beads onto some wire. When I was done I tired the wire around the trays to act as hangers so I could put them up on the wall. I did two of them in beads and one wrapped in lace to add a little more color.
Tuesday, January 17, 2012
Mirror overhaul!
I've had this old mirror for awhile now and I never knew what to do with it. I got it at a yard sale when I was around fourteen maybe for like a dollar or something like that. Anyway, it use to be this pink frame with roses on it and I wasn't into that. So I spray painted it plan black and it stayed that way for many years. Well today I was reorganizing my closet and turning it into a place where I can get ready do my makeup and my nails (things like that) I put the plan black mirror in there and it just didn't look right. So I took it upon myself it get creative and come up with a better look for it. This is what I came up with.
It only took about fifteen minutes to make (not counting waiting for the paint to dry). First I just painted the frame white, not worrying about the spray paint running or anything because I knew it would be covered somehow. Going into it I thought I was just going to glue some crystal beads to it, but I have all of this lace lying around and I wanted to do something with it. So I wrapped the frame in lace and when I ran out (which I knew was going to happen before I started so I was ready for it) I took some of the left over pom poms I had from the chandelier I made the other day and I tied them on. I used wire to keep everything in place and to make a handle. I took some of the lace and wove it in and out of the wire to give it a cleaner look and a much prettier one, if, I do say so myself! After all of that (which wasn't really anything at all) I was done and I had a new mirror!
Sunday, January 15, 2012
Fun with Pom Poms!
I had all these pom poms left over from my birthday party. I was just going to hang them up in my room but this morning I was feeling crafty. So I took an old soda can, a basic light kit, some old hangers, wire, and some spray paint along with my pom poms and I made a new chandelier for over my bed.
The steps were pretty easy. I kinda had no idea what I was going to do when I started. I knew the things I had laying around and I knew I was enough to come up with something. So I just kinda started by cutting an old soda can open on both ends. I later spray painted it white after making sure to fold over the sharp edges. Then I got a some hangers and some wire I had and just started making some loops. I cut the pom poms and hung them on the loops. Then I simply cut some holes in the side of the can and ran the wire in it making sure that it was securely wrapped around the loops and everything was holing together.. Once all that was done I took some lace and wrapped it around the hangers to cover them all up and to give it a cleaner look. Then I just hung it up over my bed! And I think it looks wonderful!
Monday, January 2, 2012
My kind of stained glass window.
Okay so it's not really stained glass. However when the sun comes in in the morning they great me with beautiful colors. I saw this on pinterest and I loved them. I had the needlepoint frame already. I got four for a 25 cents and I didn't know what I was going to do with them. When I saw this on pinterest I knew what to do! I have loads of fabric laying around and it only took a few minutes to finish them.I used pins to hang them up and just some sawing thread wrapped around the clasp. I was super easy and since I had everything already it was FREE! Which is the best part in my opinion.
Sunday, January 1, 2012
I had this great pair of that I had for maybe a week before my new puppy (who I had to remind myself I love dearly) has a little snack. Now while I was a little upset I knew that she was in fact a puppy and she didn't know any better. So instead of throwing my newly eaten away I took it upon myself to give them a well needed makeover. It didn't take much at all. Just some old fabric, clue, and a few tools. I think they turned out great! And I love them very much. While I will miss what they were before I'm kinda digging the new look.
Glass-less frames project
I had all of these frames lying around that had no glass. I don't know why I was keeping them they seemed useless to me. But then I got bored and I thought hey maybe I can make something with them. So I did.
First I painted them all white so they matched.
Then I didn't like them all matching. So I painted all but one of them yellow (I love colors)and I wanted to change it up a little. So I painted one bright red. When I was done I wrote the word Love on my wall placing the letters in different places. Then I just took a hammer and some nails and I put the frames over the letters. I think it lightest the corner up and looks awesome!
Subscribe to:
Posts (Atom)