Saturday, June 9, 2012

It's been about a month or so since I completely destroyed my room in the Water pipe incident of 2012. But everything is back to normal now. After a very long makeover I know have a completely different room that I am in love with! This is what my room looked like before I completely destroyed it and had to start all over. And this is what it looks like now!

Monday, April 9, 2012

What happens when you give a craft-er a drill....

Let me just tell you about my biggest fail ever!

So I was getting ready to get a new bed when I deiced that I should get a bunk bed, so that Megan (my brothers "girlfriend") has somewhere to sleep when she comes over. I also wanted something that my parents could keep after I left to use for grandkids and other guest and such.

So that being said, we needed somewhere to put it. So I got the brilliant idea of hanging selves on the wall so I could get rid of the big cheap walmart selves I already had.

Well I had never put selves on the wall before and my father wanted them perfectly centered on the wall and for the brackets to be perfectly centered on the selves. This meant that we would have to be anchors in the wall to keep the selves up because we couldn't just put the selves in studs. This was our first mistake.

Our second mistake was letting me be the one to hang the selves, as I had never done it before and I clearly didn't know what I was doing...Oh you don't think I clearly didn't know what I was doing. Well let me just put your mind at ease.


This is a picture of the first two selves that went up. It took me about 8 hours and two days of fussing to get them up on the wall. If this isn't evidence enough left me just reassure you some more.


This is a picture of what happened when I tried to hang the third and final shelf. See what no one told me was that there could be a water main in the wall I was drilling holes in for Three days now. So when I hit a little snag with the drill I had no idea that "little snag" would be the hot water line. Well 100 of gallons of water and a very wet and destroyed room later. I was up to my knees in a new problem.


It took three days to clear out all the water and everything that got ruined. I was lucky that my uncle had just came home when I popped a hole in the line, he was able to go out and turn it off before the whole house was flooded.

After the longest week of my life we decided that the baseboards needed to come up because they looked too water damaged to stay.

This is where mistake number three comes into play.


This would be me after taking down half of the wall. I realized it was too far gone when I put the crowbar to the wall to take the baseboards off and it went right throw it. I also realized just how big a mess I made when it only took a few minutes to take it down because it pretty much just fell off the wall.

Now we are in the midst of redoing the whole room. I lost just about half of everything I own including the two book selves that had made it safely onto the wall. We're all in good spirits about it...for now anyway. We'll see just how long that last.

We've all learned a very valuable lesson here.
My dad learned that when I say I don't know how to do something and I need help, that he should really come help me.
My mother learned that I can throw away stuff and I'm not really a hoarder(well mostly not a hoarder).
My uncle learned he can run really fast in a flood.
And I learned that I have to get married one day so I have someone to use a drill for me!

The magic of spray paint!


I have hated this lamp since I got it. My brothers ex wife left it here when she left and I've had it on my desk since. I've always wanted to do something about it but never cared enough to take the four minutes to do anything about it. Well today I was giving my old nightstand a makeover and I thought it was the perfect time to give my lamp a little makeover as well. So while I was outside I just sprayed it with a coat of cream colored spray paint. It looks a million times better and now I don't hate it!

Nightstand to Morningstand!


I've had this end table for awhile. I found it while I was driving around looking for some good trash to pick. It was my pick of the day the morning. Now I liked the way it originally look, but since I've been redoing my bedroom it doesn't really fit in. So I decided that I would give it just a little makeover. The best part is, it was free!


First I had to sand it all down and get out most of the bumps and bruises. It didn't take long at all because we have a electric sander. After a few minutes of sanding I cleaned up all the dust. I had two cans of spray paint that I had left over from another project. I used a mint green on the outside but I wanted the do something a little different. So I painted the drawer a cream color.


After I was all done painting I let it dry and took a draw pull off of an old dresser we had. I spray painted the draw pull with some brass spray paint we had for our shelf project. While that dried I drilled some holes and then put the new pull on.

I think it turned out awesome and I love the new look! It only took about 20 minutes (Thank goodness for fast drying spray paint.), and like I said it was free! But if you wanted to do something like this the spray paint I used cost about 4 bucks each.

Sunday, March 18, 2012

Oreo Truffles!


This is so easy! You only need three things and it take about 40 minutes to make. Oh and they are amazing!!! So much fun to make too.

All you need is a package of Double Stuffed Oreos.
4-8oz of Cream Cheese. (I used 6oz and they were awesome!)
and your favorite melting Chocolate.


First crush up the package of oreo's. You can use a food processor but I just did it the old fashion way. By wrapping them in wax paper and beating them to death with a rolling pin!
It's a great stress reliever.

You can set aside some of the crumbs to use to top off your truffles later on.


Once you've finished crushing all the oreo's put them in a mixing bowl along with your Cream cheese. (Make sure you cream cheese is room temp)


Once you've mixed your cream cheese and oreo crumbs together roll them into small balls. (about an inch big)once you've filled up the tray put them into the freezer for 15 minutes.


While the oreo balls are chilling start melting your chocolate. I used chocolate baking chips. The kind that go into cookies. It wasn't melting the way it usually does so I had to had some water and turn the heat up. If you add milk it will start to turn into fudge. Adding water and turning the heat up will thin it out but your chocolate won't harden all the way. This was okay in our house because some people don't have teeth. (You can also use butter to thin out your chocolate.


Once your oreo truffles have hardened you can dip them into the chocolate, being sure to cover the whole truffle. Once they have been covered put them back into the freezer for another 15 minutes and clean up your mess.


After 15 minutes (and you've finished cleaning) enjoy! They are pretty amazing and almost impossible to mess up.


This is the original recipe that I used and the website I got it from.
http://www.chef-in-training.com/2011/11/no-bake-oreo-truffles.html

1 package Double Stuffed Oreos
4 oz. cream cheese, softened (you can use up to 8 oz., I just like this consistency better)
Dipping chocolate
Chop Oreos up finely in a food processor. Save some of the finely crushed Oreos for garnish later and set it aside. You don't need too much.

With hands (or a spoon, I just think hands are faster), mash softened cream cheese and crushed Oreos until well combined.

Roll into 1" balls and place on a wax covered cookie sheet. Put in freezer for 15 minutes.

While balls are in freezer, melt chocolate according to directions.

Pull the Oreo Truffles out of freezer, and dip into chocolate. Garnish with reserved Oreo crumbs before the chocolate sets up.

Let chocolate set, refrigerate and enjoy!

Wednesday, March 7, 2012

Jewelry holder


Before and after! This is my new jewelry holder.


I found this in someones front yard and thought I could use it for something. I was going to make a table out of it awhile ago, but the wood was too thin.


So I spray painted it a light blue I has used when I redid my cabinet with. I just gave it a light covering because I wanted to be able to see the original wood behind it.


After I was done with that I added a couple hooks in the middle and along the bottom to hang necklaces.


And now it's done! I happen to love it.

Wednesday, February 22, 2012

Gators!


Okay, in case you didn't know, I happen to be a very big Florida Gators fan. So the other day when my father bought me home a roll of Gator duct tape, I of course needed something to put it on. That thing just so happened to be my laptop. It only took a few minutes and I happen to love it!

Wednesday, February 15, 2012

Rollin' in the crafts!


I've been trying to get a little more organized lately, but that doesn't mean I can't make organization look cute!


Before, it was just a little too plain to me.


I started by spray painting the frame light blue and the drawers yellow, but it was still too plain for me.


I had these how to paint bird books, so I cut out some of my favorite ones.


I glued the birds onto the front of the drawers. It was super easy and I love the way it turned out!

Tuesday, February 14, 2012

Happy Valentines Day!!!


This Valentines day I wanted to do something special for my coworkers at church. So I decided to make homemade goodies for them. I looked for a good no bake recipes and I found these peanut butter truffles. They were so easy to make so I thought I'ed share.


I started by melting the butter and peanut butter together.


Then after it was all melted I added the flour, sugar, and vanilla.


Once everything was together I rolled the ingredients into balls and let them set in the freezer for an hour.


Before I dipped them in the chocolate covering I added my own spin on things by sprinkling a little cocoa powder and powder sugar on top.


After they set I melted some chocolate chips on the stove and covered them. Later I wrapped them in plastic and a put them in some snazzy bags. Everyone said they loved them so I though I'ed share.


Now I changed the original recipe a little because I was making more than it called for but I'm going to post the original one that I got from www.cookingwithchopin.blogspot.com

It's a great blog and you should check it out!

5 tbsp butter
1/4 cup peanut butter (preferably natural)
1/4 cup granulated sugar
1/2 tsp vanilla extract
3/4 cup all-purpose flour

Coating:
3 tbsp butter
1 (4 ounce) bar of bittersweet chocolate

Line a baking sheet with parchment paper.

Place butter and peanut butter in a microwave-safe bowl, and melt in 30-second increments in the microwave, stirring occasionally.

Stir in the sugar and vanilla. Add the flour in three batches, stirring to combine well each time. Dough will be quite thick.

Working with about 1/2 a tablespoon at a time, roll dough between your palms into round balls. Place on baking sheet and freeze until very firm, about 1 hour.

For the coating, melt butter and chocolate together in a small saucepan over low heat, stirring until smooth.

Using a toothpick, spear peanut butter balls one at a time and dip into chocolate. Tap lightly against the side of the pan to remove excess chocolate. Place back on parchment-lined baking sheet. Repeat with remaining balls and refrigerate until set, about 1 hour.

Monday, January 23, 2012

Somewhere to rest my head.


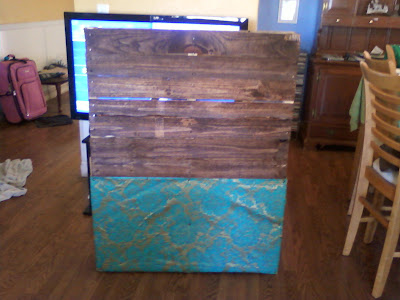
Last night I picked my mother up from work. While I was outside waiting I noticed that there was a pallet laying on the ground next to the trash can. So I got my happy little butt out of the car and put it in the back seat. This morning I got the pallet out and decided it was going to be a headboard.

I have a house full of useful things so everything was just laying around which meant this craft was free! Which in my opinion is the best kind of craft!

It was so fun and easy. I got to stain wood for the first time ever!
I started by taking off the wood on one of the sides and covering half of one side.


Then I stained it with some wood stain we've had laying around our house for years and never even opened.


After that all dried I took an old picture frame and I used the back of it as the lower half of my headboard and covered it with some old fabric I had in my room.


Then I needed something for the top because I'm going to use the top as bookshelf. So I had these old pieces of wood that came out of the bottom of an old dresser. They had just been in the back of my closet so I got them out. (They aren't going to be up there forever just until I can cut down the old shelf I have in the back yard.


I cleaned them off and stained them.


I attached the shelf bottoms to the top of my headboard to give me a small shelf for my books.


This is the back. I wanted this headboard to be awesome in a lot of ways, I added some lights to the back.


So now it lights up too!